Sunday, September 25, 2016

To Have an Art Studio? The Ultimate Crafter's Question

Often times I get to wondering about what my favorite artists' crafting spaces look like. I read things like 'kitchen table' or 'corner of my bedroom' but I never really get to see what they actually look like. The internet doesn't provide much help in this regard either. I mostly just get Pinterest results of staged organization ideas. Nobody is that clean. Not even me. Trust me, even with a nice space inspiration sometimes never comes. And keeping it nice is even more of a chore. So, I've decided to share a bit of my own past and present with the whole picture perfect studio vs. home studio debate.

I had an art studio once. It was both good and bad. It was good because it was the perfect place for me to emerge from my two year long creative slump. And it was located next door to my job at the time. And it got me away from the house. And it was filled with sunlight. See:

This is the room when I first encountered it.

I first came across this space when the World's Littlest Skysecrapr and attached boutique was changing hands. The new business owners were about to take up residence inside of Hello Again and the old owner was moving away. The old owner was a regular of mine at the restaurant next door. For some reason, I had never actually been inside the skyscraper, so I decided to visit and tell her goodbye. And fell in love. And was told no, I could not rent out the empty space.....because. The new owners later changed their minds, but not before I had spent a couple days at home crying over the matter:

Still rocking my Pi shirt though!

This happened roughly in May of 2015, not that long ago really. At the time I really needed to have a place of my own. It needed to be a place that was neither work nor an apartment that I was quickly tiring of. It needed to be a space specifically for crafting. This room fit the bill!

Beading desk, chair, stool, and old tv stand for storage.

Jewelry displays/hidden storage.
This and two other pieces were the only things I sold in six months in the studio.

If I remember right, the space measured about 14x16 feet. So, not much bigger than a craft show space. It was perfect. I got to meet tourists because of the building itself. I had a downstairs neighbor who was a colored pencil artist. And I got lots and lots of sunlight! But all of this didn't last long. I soon started a second job inside of town, rather than downtown. I then left my restaurant job for the second job and had less mandatory reason to frequent downtown, especially with an erratic schedule. Then I bought my new/old car back in October and had to make the tough decision to replace my studio rent for car payments. But never fear! I was not terribly upset because by that point, JD and I were on the way to moving out of our sad apartment and into a three bedroom house. :-)

This ended up being an even better thing for me. For all my fancy studio, there was very little I could do to work on tutorials, or blog or, you know, stay in the building past 5:30 PM. It was a very sad thing to be kicked out right when I'd just started being excited about a project. Or to only be inspired on Mondays, when the building was closed. :-(

I like having a home studio anyways. I can bead in my pajamas. Here are some images I took fairly recently:

Beading desk with beads up top, MST3Ks, tins, WIPs, magazines, etc. (Set up in the space between the hallway and hearth.)

Work surface with WIPs, current issue of BEADWORK, Oopsie Pikachu plush, and Evil Stan pretending to be Batman.

Bonus room computer desk setup.
Bonus room closet setup.Various art supplies and cosplay stuff. Fisher Price toy collection on top shelf.

Bonus room doodle desk! Old school desk from my grandmother's house. Side table and nerd display.

 It's strange. I never would have thought that working from home would have been the preferable option. I have gotten SO SO much work done these past eight months. But I was really tired of that old apartment and don't miss it at all. I miss a few things about the studio though. My downstairs neighbor was super nice, but she wasn't there very much. The furniture was really cool, especially that desk. But it was on temporary loan from a fellow artist friend. :-( And, of course, the sunlight. It always comes down to that with me. I get a fair amount in the mornings now, but not enough. Maybe someday I'll be able to afford patio furniture and be able to bead outside while enjoying breakfast! (Any bug candle suggestions?)

Tonight's listening pleasure: Ingrid Michaelson <3 <3 <3

Wednesday, September 21, 2016

Recent Bead Looming Examples

Okay guys, I know what you're thinking. You've just been reading this post and this post. And now you're asking "Can bead loomed pieces finished in such a way really stand up to daily wear and tear?" The answer is yes, yes they can.

My first example will start you off with what you're already used to seeing: ribbon crimps. I have a love/hate relationship with ribbon crimps. Pros: they give the work a nice, clean looking edge and allow for a variety of interesting clasps. They are simple to use and easy to source. Cons: I'm always suspicious they're hiding something such as selvage edges or glue or something else. They ALWAYS end up crushing a few of my beads and I hate it. I know that if I ever took the ribbon crimp away, I'd be left with a sad mess of broken beads and exposed threads. :-( But I'm showing you what you're used to seeing, even though I have nothing to hide under there. (except the broken beads of course). I do wear this bracelet quite often, just in case you're wondering. 


Second: completely exposed edges. No threads hanging around. No cover ups. Just a (not so simple) loomed panel stitched to a piece of fabric. This is the current key fob that I've been using. I'm so happy that I finally got around to making one for myself. It's held up pretty well I think. The panel itself is loomed with four stripes of Delicas and a peach stripe of Japanese 11/o's. I had to rip it apart four times before I finally figured out how to get the two sizes of beads to lay flat. It's sort of a looming/peyote stitch combo.


Third is the No Face pixel art bracelet that I've been working on. I needed a way to finish it for a friend of mine to wear. So I stitched up four little soot sprites, which are ADORABLE! They are made in square stitch and attached to the loom panel. Two of them each have a half of a snap closure, which is a neat method, since two of the sprites line up perfectly together when worn. I'm also amazed at how fuzzy they turned out, considering it's hard to get beads to look so soft. No reports yet on the status of the bracelet's condition, but I'm sure it's fine.


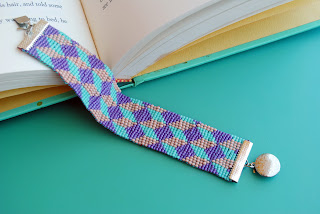
And lastly, the final proof in this technique's resistance to the destructive power of friends. Also a testament that looming like this with shaped beads also works quite well. I made this bracelet on a whim, and my friend BriAnna promptly made puppy eyes at me to have it for her own. (My #1 hint that something I made is a good design. She 'steals' all my best work.) She is the most destructive person to Vanishing Pearl beadwork that I've ever met. And also the sole reason that I have finally stopped using Fireline. My best friend, and my best critic all wrapped into one. Briasco for short.


Pictured below is my incredibly awful attempt at making a wire clasp. Again, the reason I was more than happy to give it away. It also has several rows too few of the cream beads near the end. I was attempting a fold over method of closure prior to capturing the warps between the wefts. Despite these mistakes, NONE of the warps have pulled themselves free. And that's even accounting for the cross hair gaps between the superduos. This bracelet is also woven in a combo bead looming/peyote stitch method. Enough said.


I hope you enjoyed these examples. I've had a lot of fun this year making so many looming variations. And I'm excited to keep going! Please comment if you have any questions at all. :-)

At Long Last! Bead Looming Warp Finishing Made Easy!

Hello all!!! I am super excited to announce that I have finally finished my newest diagrams to show you how to easily finish off those pesky loom warps. Illustrator is always a challenge for me, but I did it! *whew*

Since about March, I have been on a bead looming kick. Meaning I made about three full pieces between my other projects this year. It's been nice to return to my beading roots after so many years. 13 year old me would be very proud.

Here is my original post on the topic of looming in warp threads:

Revisiting My Old Loom and A Warp Finishing Tip

And now, to bust that myth that beaders around the world agree on: Looming is too hard because warp threads are such a pain. Not true! Observe:

Step 1: Cut your finished panel from the loom after tying in your working weft thread.

Step 1 pictured with my illusion blocks bracelet.

Step 2: Thread any warp thread on your needle. Skipping over the last weft, insert your needle BETWEEN the wefts on rows 2 through 9. Eight rows is adequate. Go through more if desired.

Step 2 pictured with blue warps and red wefts. The needle is BETWEEN nine rows of wefts.

Step 3: Pull the warp thread tight. Repeat for all warp threads and trim close to the beads.
Step 3 pictured. The warp thread becomes invisible and leaves a clean edge!

That's all folks! It's just that simple. Traditional methods have you weaving in each thread through a multitude of beads (and sometimes even breaking them with too many thread passes). Some have you weaving a selvage edge and covering it up in some manner. Others have you using the warps to string beads for various clasp closures. Some even have you pulling warp threads vertically one at a time, leaving little visible loops around every other edge bead. I've never liked any of those methods.

Here, you don't even have to pass through a single bead if you don't want to! Sometimes I will take the outermost threads and weave them towards the center so that the cut ends won't show, but that's it. No more broken beads! No more hours weaving in threads! No more hassle! No more cover ups! Just clean edges. The end.

Have questions? Please comment! This seems too good to be true, but I promise it's not. Happy beading!


Sunday, September 11, 2016

Makeover Part Three

Alright, last one for now. This last piece, again in the pinkish color scheme, was made in 2011 along with my other senior show pieces for my BFA exhibition. However, I don't think I included it with the other two versions of the same bracelet. Well, because the bugles along the edge didn't lay right. I shouldn't have deviated from an already good design. Look:

Version 1 with ugly ugly bugles butting up against each other. Yuck.

Fortunately, I realized my mistake. (The other one was using Fireline in combination with bugles, and I still haven't remedied that bit yet. I'm holding out to see if it will stay intact for now.)

Version 2!!

Closeup of clean edge and the etched copper.

Entire bracelet.

This bracelet is called Red Ajoure. Fitting I think. And I'm loving my ModaHaus solid colored backgrounds. <3 I just wish I had a bigger one so I could properly capture the gradients. What do you think?

Today's listening pleasure: Train. I will admit to being a fan girl as way back as the 90's, not a few years ago when they became popular again. I have been to two concerts though! Those were fun. :-)

Sunday, September 4, 2016

Speaking of Makeovers....

I have a second necklace that has undergone some reconstruction. However, I don't have an image of what the original looked like. Considering I made the thing six years ago, I find that hard to believe. I did manage to find this photo of the matching earrings though:

Sorry for the poor quality.

As you might be able to tell, they're made from Cellini spiral, a stitch I was fond of for a few short years. That is, until this necklace and earrings both busted apart. I can tell you exactly what the problem was too.

1. I was using Fireline, which in hindsight is super stupid because it ends up being so brittle after a few years.

2. It was mostly the size difference between the triangle beads I was using and the 4mm twist a beads (or fossil beads, whatever they're called) was too huge and put too much stress on the thread. That goes to show that bead choice does matter. Or you'll end up paying for it.

And now, the touched up version of my Cellini spiral necklace, only without the spiral bits:

Tada! All fixed!

Detail of one half of the original tube.

I like it much better this way anyway. Much less bulk to it. I also had to change up the stringing order of the accent beads during the reconstruction.

If you like this piece and would love to have it for your own, I just now added it to my Etsy Shop. Happy Sunday! I think I'm going to go back to sleep for a bit. I've had an off week and am slowly recovering.

Today's listening pleasure: ........I forgot to play anything, so I guess the hum of my computer and the air conditioning unit.