Sunday, November 6, 2016

Musings on Coffee and Pinterest

So I've noticed that I haven't blogged in about two weeks, which is a personal misstep for me. I've been intending to do so once a week, preferably on Sundays. The time change is killing me. And so is barista work. :-/

I was doing so well at waking up on time every day too...

So, for those of you who frequent coffee shops, corporate or local, be kind to your baristas. We're working as hard as we can, and we know the volume is ramped up because it's fall now, and we know the wait times can be long. It's difficult for you and us both. But I still had a good day! I was slinging drinks like a maniac and smiling despite the long lines and frustrated stares. This time last year I was crying inside.

A year and a half at Starbucks and now I think I'm ready for this:

My coffee master journal!

I haven't opened it yet, but am excited to do so!!

Enough about my job. Let's talk about Pinterest. It got me back into beading. Seriously. Not kidding here.

I had signed up for an account back in 2013, when Pinterest was still new. I didn't utilize it much but did see it's potential for artists. Besides this blog, it is now my sole means of social media sharing. Never had a Twitter, and Facebook bit the dust for me in 2014. Everything older long ago vanished from my life as well.

I'm no Pinter-mom or Pinter-wife or Pinter-girlfriend. I'm just looking for beading inspiration by browsing. And this gets the gears turning in my head.

Can't decide what to make? Duplicate something from a board.

See something you think is clever or ingenious? Save it for later. Make it now. Whatever.

I basically like the fact that I can keep all the imagery that I find interesting saved to an online account and not on my hard drive. They're much easier to organize this way. (I do still have quite a back log of old pictures to sort through on my hard drive. I'm trying to get it pared down.)

However, when I'm trying to legitimately research something on Google, I receive umpteen Pinterest results that may or may not link back to the original source material. :-/ It can be a scourge at times.

I apologize that I don't have an example of this conversation topic, but here's a photo of me dressed up as Waldo for Halloween:

They'll never find me behind this TV box...

Bye for now!

Sunday, October 16, 2016

A Piece for Me and a Rust Warning

Good afternoon! Today I wanted to share a short post about making pieces for yourself. Just do it. All the time.

For years, I was caught up in making humongous 'pieces of art' that nobody in their right mind would wear on a daily basis. I do occasionally wear such things to gallery openings on campus or to other fancy one night events. I was also caught up in trying to make things that would sell at craft shows. Both of these endeavors eventually resulted in Tamara burn out, meaning I just quit making altogether. Those were an unhappy two years for me.

The moral of the story here is to listen to your mother. Mine also happens to be an artist. (Emily Allison Studios) K.I.S.S. Keep it simple, stupid. Those words still echo in my head every time I'm about to get ahead of myself. And I pretty much always listen to them now. The times that I don't inevitably end up as sad little U.F.O.s (unfinished objects).

One day last summer, my mother sent me a text of my niece Emmy, short for Emily, as she was named after mom. She was wearing some necklace that I made eons ago. (Imagine picture of adorable mini me here. I can't find it on my disorganized hard drive. *sad*) So I sent her back this picture:

Ugly mug of yours truly featuring fly away hairs, bottle cap necklace, and my "Don't Worry, Bead Happy" shirt!

I've had this necklace for about three years now. I made it right in the middle of my artistic slump. Because JD brought me home the Root Beer bottle cap beads and a shirt from a bead store he found in the Mall of America. Something about the beads made me want to make something for ME. And I did.

And when I did, I kept it simple. There is no clasp, since the repeating pattern is long enough to slip over my head. The peyote tubes and bottle cap beads are strung on beading wire and attached to short segments of gold plated chain (which have since rusted to copper since I keep this piece in my bathroom). Don't keep cheap metals in your bathroom!!! Don't!!! Unless you don't mind the oxidation and/or erosion that happens. In this case, I didn't mind, since I didn't really like the gold color in the first place. It was just all I had at the time.

Ever since I made this necklace, something has changed about my beadwork. I make things that I like. I make things that I WANT to wear. I make things that match my wardrobe and personal style. I make things for ME. And that's important.

Today's listening pleasure: Don't Wanna Know by Maroon 5. I can't say that I'm a big fan of their new work. I think I've grown out of it. Sad day. Oh well, on to better music to bead to!


Monday, October 3, 2016

I Win at Chinese Checkers!!

A quick blog post as I wind down form work tonight/this morning. Chinese Checkers is one of those games that is very nostalgic for me. It always reminds me of summers at my grandmother's house. She had an elaborate wooden board and a tin full of colorful marbles. Fond memories. :-)

It turns out that a love of this game is something that JD and I share. And last year he asked me to buy him a game for his birthday. So I did, but just the board. I had to do a lot of searching in the thrift stores here before I found a board made out of tin. Sadly, the drawers don't open very easily due to a few dents. I don't have legitimate marbles anyways. I decided to make my own!!

Typically, I was very very late getting JD his present. He got to stare at the board for a couple months while I stitched together 60 little beaded beads from old Twist A Bead necklaces. I've always called them fossil beads because my mother did. As always, I underestimated the amount of time it would take for a big project. Here's the finished result and my winning move:

My best game of all time. JD lost by a single move.

If you've never played three colors on three, I suggest you should. It makes a mess of the board and things can heat up pretty quick. I played a game recently with five players and my friends got super intense, which was a surprise since a couple of them had never played before.

Anyway, here's the tutorial I used to make the beads. I had tried a couple designs on my own before giving up and asking the internet for help. My skills in independent 3D design are sadly lacking. :-( After stitching all of them, I gave them each a good dunking in Mop and Glo for stability. Now none of them squish. Best trick ever. It dries clear!! And true to my nature, I also have stored these 'marbles' in a tin of my own, one featuring Gunter the Penguin from Adventure Time. *nerd*

That's all I've got for now. Enjoy your week!

Tonight's listening pleasure: Empire of the Sun. Their new single To Her Door is making me a little sleepy with it's soft melody. I may nod off soon.


Sunday, September 25, 2016

To Have an Art Studio? The Ultimate Crafter's Question

Often times I get to wondering about what my favorite artists' crafting spaces look like. I read things like 'kitchen table' or 'corner of my bedroom' but I never really get to see what they actually look like. The internet doesn't provide much help in this regard either. I mostly just get Pinterest results of staged organization ideas. Nobody is that clean. Not even me. Trust me, even with a nice space inspiration sometimes never comes. And keeping it nice is even more of a chore. So, I've decided to share a bit of my own past and present with the whole picture perfect studio vs. home studio debate.

I had an art studio once. It was both good and bad. It was good because it was the perfect place for me to emerge from my two year long creative slump. And it was located next door to my job at the time. And it got me away from the house. And it was filled with sunlight. See:

This is the room when I first encountered it.

I first came across this space when the World's Littlest Skysecrapr and attached boutique was changing hands. The new business owners were about to take up residence inside of Hello Again and the old owner was moving away. The old owner was a regular of mine at the restaurant next door. For some reason, I had never actually been inside the skyscraper, so I decided to visit and tell her goodbye. And fell in love. And was told no, I could not rent out the empty space.....because. The new owners later changed their minds, but not before I had spent a couple days at home crying over the matter:

Still rocking my Pi shirt though!

This happened roughly in May of 2015, not that long ago really. At the time I really needed to have a place of my own. It needed to be a place that was neither work nor an apartment that I was quickly tiring of. It needed to be a space specifically for crafting. This room fit the bill!

Beading desk, chair, stool, and old tv stand for storage.

Jewelry displays/hidden storage.
This and two other pieces were the only things I sold in six months in the studio.

If I remember right, the space measured about 14x16 feet. So, not much bigger than a craft show space. It was perfect. I got to meet tourists because of the building itself. I had a downstairs neighbor who was a colored pencil artist. And I got lots and lots of sunlight! But all of this didn't last long. I soon started a second job inside of town, rather than downtown. I then left my restaurant job for the second job and had less mandatory reason to frequent downtown, especially with an erratic schedule. Then I bought my new/old car back in October and had to make the tough decision to replace my studio rent for car payments. But never fear! I was not terribly upset because by that point, JD and I were on the way to moving out of our sad apartment and into a three bedroom house. :-)

This ended up being an even better thing for me. For all my fancy studio, there was very little I could do to work on tutorials, or blog or, you know, stay in the building past 5:30 PM. It was a very sad thing to be kicked out right when I'd just started being excited about a project. Or to only be inspired on Mondays, when the building was closed. :-(

I like having a home studio anyways. I can bead in my pajamas. Here are some images I took fairly recently:

Beading desk with beads up top, MST3Ks, tins, WIPs, magazines, etc. (Set up in the space between the hallway and hearth.)

Work surface with WIPs, current issue of BEADWORK, Oopsie Pikachu plush, and Evil Stan pretending to be Batman.

Bonus room computer desk setup.
Bonus room closet setup.Various art supplies and cosplay stuff. Fisher Price toy collection on top shelf.

Bonus room doodle desk! Old school desk from my grandmother's house. Side table and nerd display.

 It's strange. I never would have thought that working from home would have been the preferable option. I have gotten SO SO much work done these past eight months. But I was really tired of that old apartment and don't miss it at all. I miss a few things about the studio though. My downstairs neighbor was super nice, but she wasn't there very much. The furniture was really cool, especially that desk. But it was on temporary loan from a fellow artist friend. :-( And, of course, the sunlight. It always comes down to that with me. I get a fair amount in the mornings now, but not enough. Maybe someday I'll be able to afford patio furniture and be able to bead outside while enjoying breakfast! (Any bug candle suggestions?)

Tonight's listening pleasure: Ingrid Michaelson <3 <3 <3

Wednesday, September 21, 2016

Recent Bead Looming Examples

Okay guys, I know what you're thinking. You've just been reading this post and this post. And now you're asking "Can bead loomed pieces finished in such a way really stand up to daily wear and tear?" The answer is yes, yes they can.

My first example will start you off with what you're already used to seeing: ribbon crimps. I have a love/hate relationship with ribbon crimps. Pros: they give the work a nice, clean looking edge and allow for a variety of interesting clasps. They are simple to use and easy to source. Cons: I'm always suspicious they're hiding something such as selvage edges or glue or something else. They ALWAYS end up crushing a few of my beads and I hate it. I know that if I ever took the ribbon crimp away, I'd be left with a sad mess of broken beads and exposed threads. :-( But I'm showing you what you're used to seeing, even though I have nothing to hide under there. (except the broken beads of course). I do wear this bracelet quite often, just in case you're wondering. 


Second: completely exposed edges. No threads hanging around. No cover ups. Just a (not so simple) loomed panel stitched to a piece of fabric. This is the current key fob that I've been using. I'm so happy that I finally got around to making one for myself. It's held up pretty well I think. The panel itself is loomed with four stripes of Delicas and a peach stripe of Japanese 11/o's. I had to rip it apart four times before I finally figured out how to get the two sizes of beads to lay flat. It's sort of a looming/peyote stitch combo.


Third is the No Face pixel art bracelet that I've been working on. I needed a way to finish it for a friend of mine to wear. So I stitched up four little soot sprites, which are ADORABLE! They are made in square stitch and attached to the loom panel. Two of them each have a half of a snap closure, which is a neat method, since two of the sprites line up perfectly together when worn. I'm also amazed at how fuzzy they turned out, considering it's hard to get beads to look so soft. No reports yet on the status of the bracelet's condition, but I'm sure it's fine.


And lastly, the final proof in this technique's resistance to the destructive power of friends. Also a testament that looming like this with shaped beads also works quite well. I made this bracelet on a whim, and my friend BriAnna promptly made puppy eyes at me to have it for her own. (My #1 hint that something I made is a good design. She 'steals' all my best work.) She is the most destructive person to Vanishing Pearl beadwork that I've ever met. And also the sole reason that I have finally stopped using Fireline. My best friend, and my best critic all wrapped into one. Briasco for short.


Pictured below is my incredibly awful attempt at making a wire clasp. Again, the reason I was more than happy to give it away. It also has several rows too few of the cream beads near the end. I was attempting a fold over method of closure prior to capturing the warps between the wefts. Despite these mistakes, NONE of the warps have pulled themselves free. And that's even accounting for the cross hair gaps between the superduos. This bracelet is also woven in a combo bead looming/peyote stitch method. Enough said.


I hope you enjoyed these examples. I've had a lot of fun this year making so many looming variations. And I'm excited to keep going! Please comment if you have any questions at all. :-)

At Long Last! Bead Looming Warp Finishing Made Easy!

Hello all!!! I am super excited to announce that I have finally finished my newest diagrams to show you how to easily finish off those pesky loom warps. Illustrator is always a challenge for me, but I did it! *whew*

Since about March, I have been on a bead looming kick. Meaning I made about three full pieces between my other projects this year. It's been nice to return to my beading roots after so many years. 13 year old me would be very proud.

Here is my original post on the topic of looming in warp threads:

Revisiting My Old Loom and A Warp Finishing Tip

And now, to bust that myth that beaders around the world agree on: Looming is too hard because warp threads are such a pain. Not true! Observe:

Step 1: Cut your finished panel from the loom after tying in your working weft thread.

Step 1 pictured with my illusion blocks bracelet.

Step 2: Thread any warp thread on your needle. Skipping over the last weft, insert your needle BETWEEN the wefts on rows 2 through 9. Eight rows is adequate. Go through more if desired.

Step 2 pictured with blue warps and red wefts. The needle is BETWEEN nine rows of wefts.

Step 3: Pull the warp thread tight. Repeat for all warp threads and trim close to the beads.
Step 3 pictured. The warp thread becomes invisible and leaves a clean edge!

That's all folks! It's just that simple. Traditional methods have you weaving in each thread through a multitude of beads (and sometimes even breaking them with too many thread passes). Some have you weaving a selvage edge and covering it up in some manner. Others have you using the warps to string beads for various clasp closures. Some even have you pulling warp threads vertically one at a time, leaving little visible loops around every other edge bead. I've never liked any of those methods.

Here, you don't even have to pass through a single bead if you don't want to! Sometimes I will take the outermost threads and weave them towards the center so that the cut ends won't show, but that's it. No more broken beads! No more hours weaving in threads! No more hassle! No more cover ups! Just clean edges. The end.

Have questions? Please comment! This seems too good to be true, but I promise it's not. Happy beading!


Sunday, September 11, 2016

Makeover Part Three

Alright, last one for now. This last piece, again in the pinkish color scheme, was made in 2011 along with my other senior show pieces for my BFA exhibition. However, I don't think I included it with the other two versions of the same bracelet. Well, because the bugles along the edge didn't lay right. I shouldn't have deviated from an already good design. Look:

Version 1 with ugly ugly bugles butting up against each other. Yuck.

Fortunately, I realized my mistake. (The other one was using Fireline in combination with bugles, and I still haven't remedied that bit yet. I'm holding out to see if it will stay intact for now.)

Version 2!!

Closeup of clean edge and the etched copper.

Entire bracelet.

This bracelet is called Red Ajoure. Fitting I think. And I'm loving my ModaHaus solid colored backgrounds. <3 I just wish I had a bigger one so I could properly capture the gradients. What do you think?

Today's listening pleasure: Train. I will admit to being a fan girl as way back as the 90's, not a few years ago when they became popular again. I have been to two concerts though! Those were fun. :-)

Sunday, September 4, 2016

Speaking of Makeovers....

I have a second necklace that has undergone some reconstruction. However, I don't have an image of what the original looked like. Considering I made the thing six years ago, I find that hard to believe. I did manage to find this photo of the matching earrings though:

Sorry for the poor quality.

As you might be able to tell, they're made from Cellini spiral, a stitch I was fond of for a few short years. That is, until this necklace and earrings both busted apart. I can tell you exactly what the problem was too.

1. I was using Fireline, which in hindsight is super stupid because it ends up being so brittle after a few years.

2. It was mostly the size difference between the triangle beads I was using and the 4mm twist a beads (or fossil beads, whatever they're called) was too huge and put too much stress on the thread. That goes to show that bead choice does matter. Or you'll end up paying for it.

And now, the touched up version of my Cellini spiral necklace, only without the spiral bits:

Tada! All fixed!

Detail of one half of the original tube.

I like it much better this way anyway. Much less bulk to it. I also had to change up the stringing order of the accent beads during the reconstruction.

If you like this piece and would love to have it for your own, I just now added it to my Etsy Shop. Happy Sunday! I think I'm going to go back to sleep for a bit. I've had an off week and am slowly recovering.

Today's listening pleasure: ........I forgot to play anything, so I guess the hum of my computer and the air conditioning unit.

Sunday, August 28, 2016

Makeover Time!

I'm pretty sure every beader in existence has made the mistake of using either the wrong thread or the wrong beads in a project. Either way, you end up with snapped or fraying threads when you really should have evaluated your choices better.

If you're like me (and I know you are), one or more of these broken projects end up hidden at the bottom of your supplies somewhere. Sometimes they stay there for years before you either rip it apart entirely to salvage the beads or just toss it out. Most of you delude yourselves into thinking you will one day fix the piece(s). I also find it difficult to return to those old ideas and refashion them into something more fitting with my current style. It's hard, especially if you've moved on. But sometimes, giving an old piece a new look is worth the effort.

Here is an example that I've recently re-completed.

Three Teared Asymmetrical Necklace. 2005ish-2006ish.
(Lauren Pinson Photography)
This necklace is a decade old, guys. A whole ten years it's been in my life. That's roughly 2/3 of my entire beading career. 

(Sort of) close up of problem area.
This is the general area where the piece broke. Please forgive the awful blurriness of my cropped image, as it turns out I have no detailed photo of this portion of the original necklace. Let's just suffice it to say that Nymo thread and sharp edged hex beads done up in right angle weave was not a smart choice in the long run. As you can tell, the whole piece was an experiment in asymmetry, which I was really into at the time. No so much anymore, as evidenced by my makeover version:

Final version. 2015.

I'm much happier with how it looks now! I still love the asymmetry of the pendant itself, but simplified the neck strap by a boatload. I just made simple interconnected rings using the original beads, and the black chain is doubled back on itself for the appropriate thickness. Not pictured is a silver plated lobster clasp instead of the original button and loop closure.

My teenage self tried to get over complicated. This just goes to show that mom is always right. K.I.S.S Keep it simple stupid. It took me YEARRRRSSSSS to acknowledged the fact that a pendant on a chain or cord is much nicer than a fully beaded strap that most likely gets hidden behind the neck or under long hair. I suppose this necklace was just waiting for me to grow up a little!

If you're interested in purchasing this final draft of an old design, you can buy it in my Etsy shop!

Today's book models:

House of the Wolf by M.K. Wren (In my opinion, one of the best political sci-fi books out there, and I haven't even read the second and third installments. Just found them this year. Read the first one, um, in high school.)

Strata by Terry Pratchett. (I haven't read this one yet, but it's Terry Pratchett. He's only ever disappointed me once, but I think there were special circumstances behind that. I'm super stoked about this non Discworld title though!)

Thursday, August 25, 2016

Remember When?

Remember when I said that I'd given up on a certain tutorial and that I'd never revisit it again? Well, JD had other ideas. Right after I wrote this post, he went and started working on the thing again. Independently. I suppose we really do think alike sometimes. Look at this beauty!!!!


You can purchase the full thing on my Craftsy shop or on my Etsy shop. Enjoy! I transferred the pdf to both my phone and my Windows Surface tablet. It is absolutely gorgeous on both! And 100% made of vectored images, so zooming in poses no problem. However, my Kindle Fire is too outdated for pretty much anything these days. :-(

I can't even describe what a relief it is to have finally finished the thing. I'm so excited to see it in print as well! I was attempting to teach a few classes this fall on campus, but if that doesn't work out, I'm definitely taking this downtown to the art museum for a second shot at getting a workshop. Wish me luck!

Oh, and I (not quite discreetly) dropped my next tutorial sketches into JD's current projects folder. He he he.

Today's listening pleasure: Nickel Creek. *sigh* I can never have enough bluegrass in my life. Secret pleasure.


Monday, August 22, 2016

Wish I Had a Green Thumb.

I do wish I were good at growing things. I once had an African violet. It died. To be fair, I didn't know that those flowers are really, really hard to keep alive. It's a good thing I'm not ready to ever attempt to care for orchids. Nope.

But a geranium should have been easy, right? Also, nope. I bought one in May from the Walmart 'nursery.' Nursed it back to life maybe. I watered it and gave it new potting soil and spread coffee grounds over it and even bought plant food for it. Look how well it was thriving a few weeks later!


My poor geranium fell victim to accidental over spray of Weed N' Feed one night when I was fertilizing my lawn. *sigh* There was no preventing the wilting and shriveling to follow. Now it's just a sad lump of former plant on my front porch:


Never fear, dear listeners! I will try again once I can afford a new plant! That's how success works, right? Learn from your failures (keep the weed killer away from the flowers) and try again. The same can be said for beading. Just be persistent!

So in the interest of growing my beading business, I am doing several things:

I am showing up to work every morning to spend a little time each day working on bead related activities. Waking up is still hard, especially after many taxing nights this week.

As you may be able to tell, I have given my blog here a face lift. My brain is geared towards purple at the moment. I changed my blog banner and my avatar icon (after several years of the last one). I have a secondary one that JD made as well that I may try, since this one is hard to read small scale. I may have him make more until we can get it right, but for right now it's universal on all my pages.

My Etsy shop is slowly coming back to life. So far, I've only edited and renewed listings for items that I still have on hand. Upcoming, I will be adding brand new work as I photograph it!

My Pinterest page is quickly growing, both in galleries of my own designs and inspirations from many, many artists around the world. It has become my go to tool for ideas and storage. I sincerely believe it has played a major role in revitalizing my own creativity. :-)

Now, to what I've been making! I've been growing as an artist. Here is an image of a three year old design:

Brick stitched cog with czech pressed leaves for petals.
I made a blue one too, just with a jump ring instead of the bead loop. Bead loops are now ugly to me. Here is one of my very latest creations:

Same basic design, just more layers. And fringe beads.

Strung on Beadalon beading wire.
The initial design was good, but it was too floppy. The added layers on each side add sturdiness to the piece. I like the contrast that the little fringe beads give to the blooms. As you might be able to tell, I've been stash busting and have used up the last of the blue ones. And now I have neither enough leaf beads or fringe beads to make more flowers. :-(

Things are looking up for me I guess. I'm just going, going, going. I even have a commission in the works and a friend agreeing to model for me in the near future (both from the same person). I'm excited. Are you?

Today's book model: The Fourth Bear by Jasper Fforde (signed!!!)

This is the best book about cucumbers you will ever read! Ever. Seriously, go read it. You can't say no to Jack Spratt being a detective. And while you're at it, go read the Thursday Next series too so I can have someone to make toast and marshmallow and time travel jokes with. Please?

Sunday, August 14, 2016

How I Motivate Myself

Are you lazy? Congrats! Me too!

Thankfully, there is a cure. It's called HARD WORK. You know, that thing none of us (including me) wants to do. Except I do. I really, really want to succeed at this thing called art. Self motivation when you're not actively seeing results is hard.

So I decided to give myself a second job. My actual money earning job is being a barista, which is, stereo-typically, my dream real world job. My pipe dream job is to make roughly $5,000/year at my work. Low expectations, I know, but I've lived below the poverty line my whole life, so this doesn't seem entirely unreasonable.

Over the last couple of weeks, I've forced myself into a new schedule. This includes housework as well because this new rent house I live in is massive compared to my old efficiency apartment. It stresses me out so bad. I would love to homestead like my parents did, including actually building the house on a piece of country land somewhere.

Anyway, cleaning DOES NOT come first in my life, as much as I like a clean home to work in. However, I did find this handy-ish guideline:

Shared by Brown Eyed Baker

Do you know what DOES come first? You're going to think I'm weird. Beading. That's it. Just start your day doing the thing you love. Or if you slept in and had to go to work, end your day peacefully doing the thing you love. It's a little more complicated than that because I have a hard time waking up, but that's okay.

Here's a rough outline of my days. I work generally between 12:00pm and 12:00am. It varies and so do my days. Here goes:

9:00 
Wake up. Snooze. Snooze again. Slap yourself awake. Get up. Stop snoozing. Get breakfast and coffee. Maybe. Remind yourself that you have work to do and nobody is going to do it for you.

10:00-10:30 
Realize how much time you lost trying to wake up. Immediately regret that you can't not be a night owl. Take whatever is left of your breakfast to your work desk for the day. Work of designated daily project until noon.

12:00
Find a good stopping point because you got way more interested in your project than you initially thought you would. Happens every time. :-) Now go play DDR for roughly 12 songs or until you break a sweat and are exhausted. This is the only form of exercise I get. Because it's a game I enjoy. Always do whatever exercise actually interests you. You'll never stick to it otherwise.

12:30ish
Shower and nap. Super important if you want to be rested later on. Don't forget to make your bed if you haven't already. I do it now because JD is still sleeping in it when I wake up.

1:00-3:00
Clean. Do whatever your daily task is. Catch up on others. Do your best not to put it off. Stick to it.

3:00-6:00
Out and about errands in town. Or play Ingress. Because everyone should be Enlightened. 

6:00-Bedtime
Do whatever. It's your day off.

Most of my shifts start at 3:30, so I can almost always make it to the cleaning step. However, I spend so many extra minutes on all the other stuff, I don't even make it that far. And I'm a work in progress. I still have lots of areas where I need to push myself better, but I'm getting it down. It's nice to be constantly working on things again, even if I see no results yet except for a personal expanded skill set.

I hope this helps all you artsy types out there. Nobody is perfect. Treat your passion like a job you have to do. But at the same time, tell yourself that all you're doing is making sure you have the time to do what you enjoy. And do it first thing in the morning. (I realize I probably get up a lot later than most of you, but I have no children and work nights. This just happens to be what works for me.)

For further inspiration, listen to Elizabeth Gilbert's TED Talk on Creative Geniuses!


Speaking of Neil, don't forget to be a goofball:

Me dressed as Death for Comic Con.


Thursday, August 11, 2016

FREE: Midnight Tutorials

Have you ever had that ONE project that just refuses to turn into a nice, professional, and clean tutorial? Well, this is mine:

Version #1


This version was a self created attempt to make a tutorial for sale. Um...I was a crazy kid in 2013. Pieces of it are hand drawn and scanned into Photoshop to create a comic book layout. This was the first of that type of tutorial. It wasn't bad, but it wasn't great either. So, I've decided to offer it for free on My Craftsy Page. Download it and judge for yourself!

Version #2

This version was JD's attempt to help me clean up the look of my pages. His illustration work was great, even then. This was back before his graphic design job downtown. However, the problem with collaboration between us is that he has no idea what the heck is going on with beadwork. So he always gets lost with text and can't proof read for me. :-( (I'm pretty sure there is a typo in here, but can't remember which step it appears in. Sorry. Let me know if you have issues.) I have come to accept my obsession is mine alone. To this day, he remains great at helping me tweak my digital illustrations, some of which you can purchase HERE. Anyway, to download Version #2, you can get it in This Other Craftsy Listing. It, also, is free.

There is obviously marked improvement between the two projects. However, I am almost convinced I will never have a completed version of this technique. Maybe I've just spent too long thinking about it. Anyway, shortly after the above projects, I started to actually get into digitally illustrating my own pieces. The above link to my (reactivated) Etsy shop will show you finished examples done in Photoshop. BUT, yet again I return to the stupid washer, this time in Illustrator: 


Much better, isn't it? *unashamed pat on back* Even getting to this stage took quite a bit of practice. But I'm determined, AND I've never had a design class in my life. It's just a ton of experimenting and looking things up online to figure out how to get the look you want. Sometimes I also take advantage of backseat critiquing from JD, who often tweaks what I've been working on all day in a matter of minutes. :-/ 

Even so, this tutorial may not see the light of day for another few months/years yet. I really want it to be out there, but I'm too much of a perfectionist I guess. My tutorials are illustrated vs. just pictures of the piece being made. It's the look I want. I wouldn't feel right taking money for something that wasn't a piece of art in and of itself, you know?

If you are curious what I'm currently working on tutorial wise, here is a sneak peek: 


Basic loom work, you ask? What could be special about that? I'll give you a hint: dig back a few posts and you'll find it. This is just a prettier version. And will be free. Again! I've just had looming and tutorials on the brain a lot lately. Mostly I'm just giving myself excuses to get back into Illustrator. You wouldn't believe how much I screwed up just to get this to look as nice as it does. All art is a learning curve. Some just don't come as easily.

Well, I hope you've all liked my rambling about my illustrating history. Look for more to come! I've figured out a way that currently keeps me interested in getting my work and ideas out there. Let me know what you think on any of this! I've got to go to sleep. I think I'm plenty wound down from work now.

Tonight's listening pleasure: Frank Turner Radio on Spotify. Meh. They all sound like him, but don't convey emotions as well. Still better than the radio in my car. What isn't?


Sunday, July 31, 2016

It's a Pastel World After All

Greetings from my local coffee shop! Meaning work because I finally earned a reward, but still..... I've become one of THOSE people..... who blog from coffee shops. :-/ At least I'm not sleeping in and wasting my morning. I'm waiting to meet with a friend for a friendly game of DDR exercising.


In the meantime, I'd like to show you a couple of the pieces I've been working on lately!


Isn't this a nice peyote link flower necklace? Want to make your own? I found Alana Reiswich's design here in tutorial form. It was nice to work from someone else's pattern for once.


I only wish mine had turned out half as nice as hers. I always end up using different beads than the tutorials I follow and am inevitably disappointed. But you know what they say? The definition of insanity is doing the same thing over and over and expecting different results. Means I must be crazy. :-p


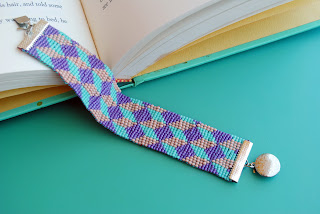
This one I am super proud of! I've been experimenting with simple loom work recently and have come to love it again (even the warps)! I'm working on a freebie tutorial for that, just stay tuned. I covered the method once already, but this will have prettier diagrams and hopefully be shared with more people than I can reach on my own.


Have you guys any idea how hard it is to find a pattern for loom or cross stitched illusion blocks? Apparently, very. Incidentally, the proper term for them is 'tumbling blocks'. I could have gone the rest of my life not knowing that little tidbit of information. *sigh* My childhood disillusioned self is very disappointed right now. Most patterns didn't look right, but I found several graphs for peyote stitch. In the end, I had to end up making my own looming pattern.

I don't have access to Bead Tool (yet) and was too reluctant to constantly mess up a billion times on graph paper. Yuck. Know what the next best thing is?

www.kandipatterns.com

Seriously, though. The target audience may be the rave scene kids, but there are plenty of uploaded pixel art patterns that are great for use with seed beads. And the site has a free pattern maker tool for both loom and single drop peyote stitch. Check it out sometime. It's worth using in a pinch. Here's the pattern I created and worked from for the bracelet above:


It may not be terribly glamorous, but it works well, especially since I couldn't find any small square graph paper at Walmart the other day. I guess I'll have to look elsewhere. Feel free to use this pattern for your own work!

Have a good day all!  I'll catch you next time.

Today's listening pleasure: Seriously, who puts together the Starbucks Spotify playlists? Super glad I'm not actually working yet.